FREE custom step-by-step instructions
What's the first step? Just ask.
Custom step-by-step instructions will speed up your next web design task. The slideshow instructions below are an example of what you can request. They cover how to create a new slideshow and add it to a WordPress website using a plugin called UR Slider. All instructions are tailored to your specific question and teach skills for a quick and successful "next time." Your first request requiring 45 minutes or less of consultation time is FREE. Most responses are available within 24 hours.
Sample step-by-step instructions
CREATE A NEW SLIDESHOW IN WORDPRESS
Using the Ultimate Responsive Image Slider plugin
- Dashboard > UR Image Slider > Add New Slider
- Give the slider a name
- Use the big Add New Slide box with the plus icon to add images for the slides. This will work best if all images/photos are the same size.
- Leave all of the other settings set to their defaults for now, but read through your choices so you can have them in mind in case you want to make changes later.
- Click the blue Publish button.
- If you would like a reference, check the Dashboard > UR Image Slideshow > All Sliders > Sample > Slideshow at UR Image Slider > All Sliders > Sample Slideshow.
ADD YOUR SLIDER TO A POST OR PAGE
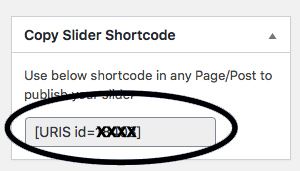
- Go to Dashboard > UR Image Slideshow > All Sliders > Sample > Slideshow at UR Image Slider > All Sliders > [your slideshow].
- Copy the shortcode provided in the left sidebar
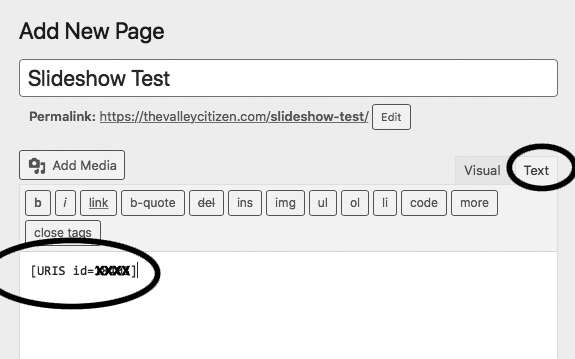
- Go to the editing screen for the post or page where you want to add the slider.
- Make sure the text tab is selected, then the shortcode to your page or post.
- Click Publish, or Update.
- Check your work by viewing the post or page.
Get your custom step‑by‑step instructions
* Indicates A Required Field
(916) 920-2791
 |
 |
 |
 |